My Mac Wouldn't Boot Up Recovery Guide
Last month, I faced every Mac user's nightmare: my Mac got stuck on the loading screen after a restart and refused to boot. What followed was a deep dive into Mac recovery methods, troubleshooting steps, and eventually a complete system recovery. Here's the complete guide to everything I tried and what ultimately worked.

The Problem: Mac Stuck on Loading Screen
My Mac got stuck during boot screen, stopping at about halfway through the progress bar under the Apple logo. Every reboot attempt resulted in the same issue - the loading bar would fill to roughly 50% and then it wouldnt progress further. If you're reading this, you're probably watching that same stubborn progress bar refuse to budge from another machine.
Step 1: Basic Troubleshooting

Safe Mode Boot
The first thing to try is booting in Safe Mode:
- Shut down your Mac completely
- Turn it back on while immediately pressing and holding the Shift key
- Keep holding until you see the Apple logo and progress bar
- If it boots successfully, the problem is likely third-party software or startup items
If Safe Mode works for you, consider updating macOS or uninstalling recently installed applications. If not, don't worry - we're just getting started with the recovery process.
Unfortunately, my Mac wouldn't even boot into Safe Mode - it got stuck at the same 50% progress bar point. This indicated a more serious system or hardware issue that required deeper troubleshooting.
Reset NVRAM/PRAM
Non-Volatile Random-Access Memory (NVRAM) stores system settings like display resolution, startup disk preferences, and other low-level configurations that could potentially cause boot issues.
For Intel-based Macs:
- Shut down your Mac completely
- Turn it on and immediately press and hold Option + Command + P + R
- Hold for about 20 seconds until you hear the startup chime twice
- Release the keys
For Apple Silicon Macs: NVRAM reset is not required and this key combination won't work.
I tried the NVRAM reset on my Intel Mac, but unfortunately, it didn't resolve the boot issue. The Mac still froze at the same 50% progress bar point.
Step 2: Recovery Mode and Disk Utility

Boot into Recovery Mode
Hold Command + R during startup until you see the Apple logo or spinning globe. From Recovery Mode, you can access several repair tools.
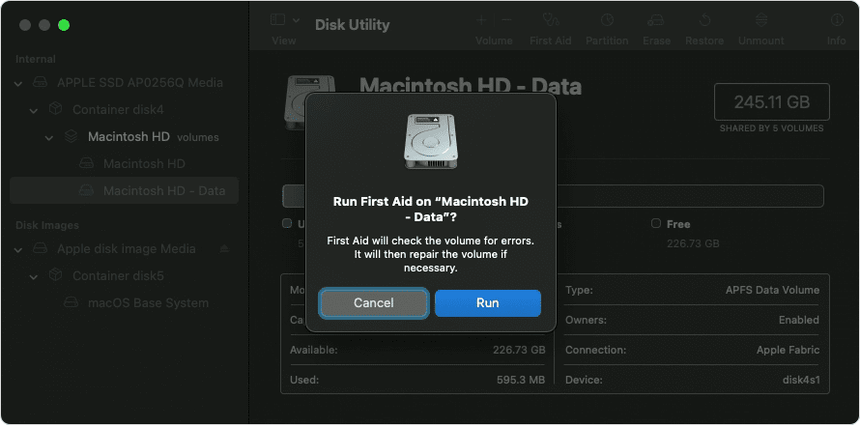
Run First Aid
- Open Disk Utility from Recovery Mode
- Select your startup disk (usually "Macintosh HD")
- Click First Aid to scan and repair disk errors
- If Disk Utility reports repairs, restart your Mac to test the fix
Reinstall macOS
If disk repair doesn't work, try reinstalling macOS:
- In Recovery Mode, select "Reinstall macOS" from the Utilities window
- Follow the on-screen instructions
- This replaces corrupted system files without erasing personal data
- Always back up your files first as a precaution
After trying Disk Utility and First Aid with no success, I tried to reinstall macOS over my the old files, since i knew this would keep my personal files intact. However, this is where I hit another roadblock, as I tried to select the Drive location to install the OS over. The drive wanst seletable and it showed a label: com.apple.buildinfo.preflight.error error 21. This error prevented the installation from proceeding and led me down a much deeper troubleshooting path.

Step 3: Error 21
When I tried to reinstall macOS, I encountered this error:
com.apple.buildinfo.preflight.error error 21
This error occurs during the preflight check process and can be caused by:
- Unstable internet connection
- Corrupted hard drive
- System glitches
- Wrong disk format
Solutions for Error 21
Use Internet Recovery Mode
Internet Recovery bypasses issues with the local recovery partition:
For Intel Macs:
- Shut down your Mac
- Turn it on and immediately press Option + Command + R
- Hold until you see a spinning globe
- This downloads a fresh recovery environment from Apple's servers
For Apple Silicon Macs:
- Press and hold the power button until "Loading startup options" appears
- Select Options and continue
Check Disk Format
Your startup disk must be APFS format for macOS High Sierra and later. Using Mac OS Extended (Journaled) can trigger Error 21.
Network Troubleshooting
- Switch to a different Wi-Fi network
- Use a mobile hotspot if possible
- Ensure necessary ports aren't blocked by network security
I tried all of these solutions extensively. Internet Recovery Mode seemed promising at first - I could see the spinning globe indicating it was downloading a fresh recovery environment from Apple's servers. However, I still encountered the same com.apple.buildinfo.preflight.error error 21 when attempting to reinstall macOS. Even switching Wi-Fi networks and trying different approaches didn't resolve the issue. At this point, I realized I needed to take more drastic measures.

Step 4: Data Recovery Before Nuclear Option
When all else failed, I decided to back up my data before doing a complete drive erase. Here's how I did it using Terminal in Recovery Mode:
Access Terminal in Recovery Mode
From the Recovery Mode menu bar, go to Utilities > Terminal.
Check Available Volumes
ls /Volumes/
You should see your Mac HD and any connected external drives.
Calculate Folder Sizes
Before copying, check how much space you need:
# Use the full path to du in Recovery Mode
/Volumes/Macintosh\ HD/usr/bin/du -sh /Volumes/Macintosh\ HD/Users/yourusername/Documents/

# Check disk space on external drive
df -h /Volumes/External\ Drive/
Exclude Large Development Folders
For developers, exclude node_modules, .next, and .venv folders to save space:
# Create compressed archives excluding development folders
tar --exclude='node_modules' --exclude='.next' --exclude='.venv' -czvf project.tar.gz /Volumes/Macintosh\ HD/Users/yourusername/project/

Step 5: The Nuclear Option - Complete Drive Erase
After backing up my data, I had to erase the entire drive:
Erase in Disk Utility
- Boot into Recovery Mode
- Open Disk Utility
- Select the top-level internal physical disk (e.g., "Apple SSD xxx Media")
- Click Erase
- Name:
Macintosh HD - Format: APFS
- Scheme: GUID Partition Map
Reinstall macOS
After erasing the drive:
- Return to macOS Utilities window
- Select Reinstall macOS
- The installation should now proceed without Error 21
The Resolution
After erasing the drive, the com.apple.buildinfo.preflight.error error 21 disappeared completely. I was able to:
- ✅ Select the newly formatted drive for installation
- ✅ Successfully install macOS
- ✅ Upgrade to the latest version (macOS Sequoia)
- ✅ Restore my data from the external drive backup
Key Takeaways
- Try basic troubleshooting first: Safe Mode and NVRAM reset can solve many boot issues
- Use Internet Recovery: It's more reliable than local Recovery Mode
- Backup before going nuclear: Always save your data before erasing drives
- Use Terminal efficiently: Learn basic commands for file management in Recovery Mode
- Exclude development folders:
node_modulesand similar folders take up massive space - APFS is required: Ensure your disk is formatted correctly for modern macOS
Prevention for the Future
- Regular backups: Use Time Machine or cloud storage
- Keep macOS updated: Install system updates promptly
- Monitor disk health: Use Disk Utility's First Aid periodically
- Clean installs: Consider fresh installs when upgrading major macOS versions
Useful Commands Reference
# List all disks and volumes
diskutil list

# Check folder sizes (excluding node_modules)
/Volumes/Macintosh\ HD/usr/bin/du -sh -I node_modules /path/to/folder

# Create compressed backup excluding common folders
tar --exclude='node_modules' --exclude='.next' --exclude='.venv' -czvf backup.tar.gz source_folder/

# Check available disk space
df -h /Volumes/Drive

# Eject external drive safely
diskutil eject /dev/disk2
While this experience was frustrating, it taught me valuable lessons about Mac recovery and the importance of having a solid backup strategy. Also I got a fresh install of OS Tahoe 😎. Hopefully, this guide helps you recover your Mac without losing your precious data!